
General
What is the difference between PebblePad, Pebble+ and ATLAS?
PebblePad
PebblePad is a personal learning and assessment tool. It contains two main components: Pebble+ and ATLAS.
Pebble+
Pebble+ (or Pebble Plus) is the creative space of PebblePad, where you can create your own portfolios, complete templates and workbooks, and upload files to use in your work. Your Pebble+ account is private to you, until you choose to share it. If you do, you can share with other PebblePad users for comment and collaboration, with the web for public viewing, or with ATLAS for feedback and assessment.
ATLAS
ATLAS (Active Teaching Learning and Assessment Space) is PebblePad’s assessment area. When a student creates work in Pebble+, it can be submitted to ATLAS for assessment by a teacher or tutor. ATLAS provides a wide range of assessment tools for evaluating students’ work and includes reporting features to monitor progress and attainment.
What are the minimum supported browser versions for PebblePad?
PebblePad requires an operating system, with the minimum version:
- Windows 10
- iOS 16
- Android 10
PebblePad requires a web browser, with the minimum version:
- Google Chrome – 121
- Mozilla Firefox – 122
- Microsoft Edge – 121
- Apple Safari – 16
- Opera – 110
For mobile devices, we recommend:
- Google Chrome for Android
- Safari for iOS
Older versions cannot keep up with the latest features and security standards that PebblePad relies on.
Can I use PebblePad on my mobile phone or tablet?
You can access PebblePad anywhere via every device. However, it is best used from your laptop/computer.
There is an app available (PebblePocket) that you can use to create assets on the go (and have them signed of by an external assessor). You can create an asset in the app and send it to your Pebble+ account.
Keep in mind: you cannot access Pebble+ or ATLAS via PebblePocket, which means that you cannot work on your workbooks or assets.
Download PebblePocket:
- App Store (iOS)
- Google Play Store (Android)
How do I change my notification settings?
You can change your notification settings in PebblePad via your Accounts settings. You need to log in first.
Why do I keep seeing a message that my Asset is still open, while it is closed.
This is why it can take 30 minutes until this red message bar is no longer visible.
However, if you navigate to your Dashboard (green Pebble+ icon on the right of the logo) after saving your work, these messages will no longer be visible.
Access
How do I log in?
UM students and staff log in with their Maastricht University username and password.
- Go to https://pebblepad.maastrichtuniversity.nl.
- Select “I have an IT account at this organisation”.
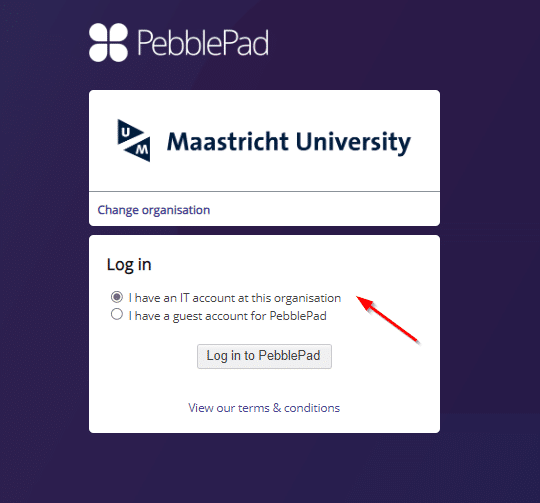
- Click “Log in to PebblePad”.
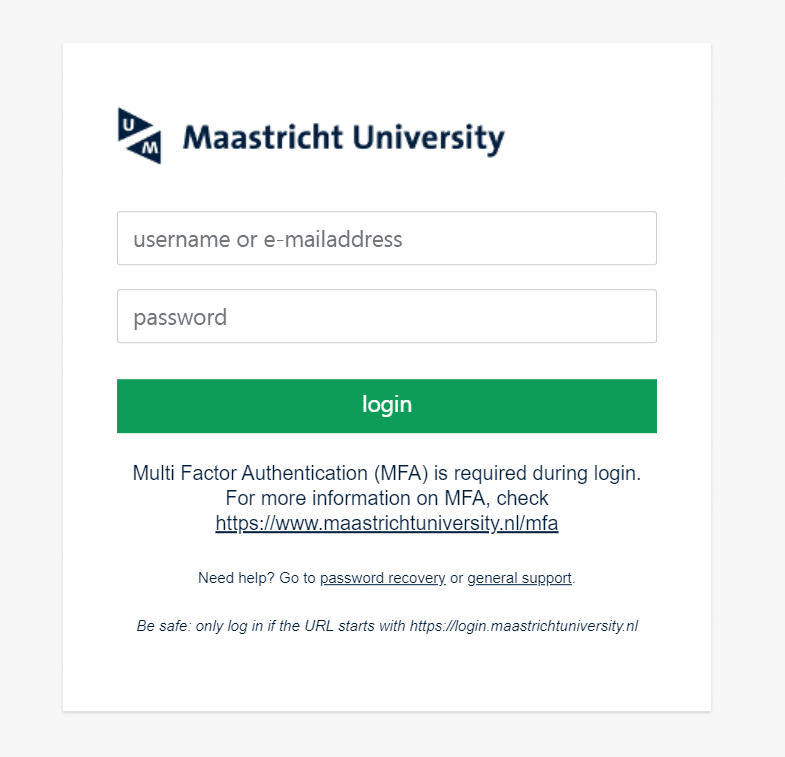
- Fill in your UM Username and Password.

External assessors
You will receive an account via your contact person at the faculty. Once you have an account, this is how you log in:
- Go to https://pebblepad.maastrichtuniversity.nl.
- Select “I have a guest account for PebblePad”.
- Fill in your Username and Password.
- Click “Log in to PebblePad”.
Creating content
What is the difference between an Asset and a Resource?
Asset: everything you create within PebblePad or uploads into the platform is called an Asset (they appear in the Asset Store). Assets are personal and not visible to others unless shared.
Resource: Resources are mostly created by teachers / learning designers and made available to their students, so that they can input information. Resources appear in the Resource Store or can be accessed via ATLAS). When a resource is opened and saved, it becomes an Asset. A resource can be a single page (form) or a complete workbook.
What file types are supported within PebblePad?
PebblePad supports most digital formats, but MP4, MP3 and JPEG are recommended.
Accepted formats include:
- Presentations (odp, ppt, pptx)
- Spreadsheets (csv, ods, xls, xlsx)
- Documents (doc, docx, odt, pdf, txt)
- Images (bmp, gif, jpg, jpeg, png, svg)
- Audio files (mp3, mp4, wav, wma)
- Videos (avi, mp4, mpg, mpeg, mov, wmv)
- The maximum size a single file upload can be is 250MB.
Does PebblePad autosave?
PebblePad does not auto-save. This means that you DO need to manually save your work before you log out or move away from your work.
The Save button appears at the top left, either with the word ‘Save’ or an icon depending on whether you are using a mobile device and the size of your screen.

Recovered work
PebblePad saves unsaved work to your browser’s local storage. If you leave an Asset or Resource without saving it, the changes are stored locally. When you next log in on the same browser and computer, PebblePad may detect a different local version and recover it to your Asset Store as a “(Recovered)” copy.
- If the recovered version has nothing you need, delete and purge it.
- If you’re unsure, compare it with the original.
- If it contains content you want, copy and paste it into the original.
I lost my Asset/Resource. Where can I find it?
Within Pebble+, you have a personal Store that contains all your Assets. Resources, Favourites and Deleted items.

You can access it via your Pebble+ Dashboard by clicking on either Assets or Resources.
Click on Get Started on the image below to see a step-by-step instruction. Also, you can enlarge this manual by clicking on the far right icon.
Sharing
Is my work in Pebble+ private?
Everything you create or upload into Pebble+ is private, unless you choose to share it. You can choose which assets you want to share, with whom, and for how long.
However, your work will directly be visible to your teacher when an asset is auto-share. This means that all changes are directly visible in the workspace. You will always receive a message that indicates a workbook is auto share and you have to agree to the terms of usage.

In the overview of your Asset Store, you can quickly see if your Asset is shared. Look at the three icons on the far right: Shared with people, Shared to web or Shared with 1 workspace. They will be greyed out and ‘Not shared’ if there are no relevant shares.

You can click on any of the 3 icons to open the Information panel. Scroll down to Shares (and/or Workspaces shared to) to see where you have shared the Asset.
How do I share my work?
Everything you create or upload into Pebble+ is private unless you choose to share it.
Click on Get Started on the image below to see a step-by-step instruction for sharing your asset in PebblePad. Also, you can enlarge this manual by clicking on the far right icon.
You can also share your work directly to ATLAS.
Click on Get Started on the image below to see a step-by-step instruction. Also, you can enlarge this manual by clicking on the far right icon.
How do I see who I have shared an Asset with?
Go to your Asset Store and look for the Asset in the list. Look at the three icons on the right: shared with people, Shared to web or Shared with 1 workspace.
You can see which assets are shared. The icons are greyed out with the text: ‘Not shared’ if there are no relevant shares.
You can click on any of the 3 icons to open the Information panel. Scroll down to Shares (and/or Workspaces shared to) to see where you have shared the Asset.

You can also see with whom an asset is shared from within the asset itself. When you are editing an asset, click on the (i) icon on the far right and look under “info”

Assignment submission and assessment
How do I submit my assignment?
You can share your Asset for assessment in two different ways: it may already be auto-shared, or you can manually share it with a Workspace.
Auto-share / Auto-submit
Some resources (such as workbooks or templates) provided to you may be set to auto-submit by your teacher.
Here’s what that means:
- The first time you click Save, the auto-submit Resource becomes your Asset and will be shared to a Workspace to be assessed.
- Each time you click Save, the Asset will also be updated in the Workspace and this new version will be immediately visible to your teacher.
- After the deadline for the assignment has passed, any further changes will no longer be shared.
When you open the Resource for the first time, you are prompted to allow auto share. Tick the checkbox to agree, then click Continue.
You can recognise an auto submit resource in your list of resources easily:

Manual submit
If your teacher has not set the assignment to auto-submit, you will need to submit the work manually to ATLAS.
Click on Get Started on the image below to see a step-by-step instruction. Also, you can enlarge this manual by clicking on the far right icon.
More information
You can read more about sharing an asset with ATLAS on the PebblePad Help Hub.
Why am I unable to share my work for assessment to a Workspace?
You might be unable to submit your work because of the following reasons:
- You have already submitted the work once.
- You are trying to submit the wrong Asset type.
- You have already submitted the maximum number of permitted submissions.
- The Workspace is set to not allow manual submissions
- The submission deadline has passed.
In any of the above apply, you may need to contact your teacher/tutor or your faculty support.
How can I check if I have submitted my Asset for assessment?
Once you have shared your work for assessment, you can quickly view your shares in your Asset Store.
Go to your Pebble+ Dashboard and click on Assets
By default, you see ‘Not shared’ on the right in your asset’s row. If your asset is shared, the text will turn blue and will change to ‘Shared with …’
If you click on the info icon to the right of the screen. Scroll down to the Workspaces shared to see what workspace your asset has been shared with.
More information
You can read more about sharing an asset with ATLAS on the PebblePad Help Hub.
Why can I still work on my Asset after the deadline for my assignment has passed?
You can still update your work in your Asset Store, but the changes will no longer be transferred to the Workspace once the deadline on an assignment has passed. Your assessor will not see the changes made after the deadline.
Can I change my Asset after submitting it for assessment?
You cannot always change your Asset after submission. This depends on how the Workspace manager has set up the assignment.
Submission locking
Your Asset will be locked if the ‘Lock on submission’ setting is enabled. This means that your work cannot be edited after submission.
You will see the following warning message before you share an Asset that will be locked after sharing.

Verification locking
Your teacher might lock specific parts of your work after releasing their feedback, so that you no longer can change it.
As a student, you will see a notification that it has been locked and that no further edits can be made.
Links to PebblePad Help Hub:
- Complete an assignment
- Work with submissions (for teachers/managers)
What does my teacher sees after I made changes to my Asset?
Open your shared Asset and you will see a blue ‘shared for assessment’-banner.
Click on the ‘Go to assessor view’-button to view your Asset at the point of submission from the perspective of the assessor.

For teachers and tutors
Can I check submissions on plagiarism with Turnitin?
Yes, you can! Find out more in our guide: How to check for plagiarism with Turnitin.
A student's file (media picker) keeps on loading
A student has uploaded a file in a workbook (media picker field), but you as an assessor cannot access the file. It keeps on loading.

Possible cause: After linking the asset, the student has removed the asset from their asset store.
Possible solution: The student can restore the deleted asset. Now the assessor can view the asset.
Can I make a change in a form submitted by a student in case of a mistake?
It depends on the block type. It can be a student field or an assessor field.
If it is an assessor field, you can edit a block as long as the assignment is not paused or locked. You cannot make changes to a student field.
You can change the role restriction (who can fill in a block) by clicking on a block and opening the properties on the right.

Getting help
Where can I get help with PebblePad?
Do you have trouble with PebblePad? Visit the Support page for contact details.
How to give temporary access to your PebblePad account
You have been asked to grant an administrator temporary access to your PebblePad account so that they can help troubleshoot or fix the problems you are experiencing.
Click on “Get Started” below to see a step-by-step guide. Click on the enlarge-icon for a full screen view.